|
|
|
|||||||


| مقالات آموزش ترفندها... Traning در این قسمت مقالات آموزشی ترفندها نکته ها و .... قرار دارند |
 |
|
|
ابزارهای موضوع | نحوه نمایش |
|
#1
 01-11-2009
|
||||
|
||||
|
نصب ویندوز 7 در ایکس پی و ویستا Install Windows 7 on XP & Vista Using Vmware Player
How to Install Windows 7 on Windows XP & Vista Using Vmware Player, A Complete Guide  Windows 7 Beta 1 Build 7000 was leaked on 25th December 2008 2 week before actually announcement for Windows 7 Beta 1. There are thousands of users planning to install Windows 7 but considering it is still in beta stage it may have bugs and driver conflict issue hence upgrading your existing windows operating system is not advisable. Best way to test and experiment Windows 7 is to install it as virtual machine which makes you free from need of Dual Boot as well as you can instantly switch between two operating systems or simultaneously operate Windows 7 (Guest OS) and Windows XP (Host OS). After successfully installing Windows 7 on windows XP using Vmware Player I have decided to post detailed steps of how to install windows 7 on Vmware Player. This guide is not going to use Vmware Workstation to create Windows 7 virtual machine only Freeware Vmware Player and other freeware tool like Qemu. Here is list of required softwares 1. Vmware Player it’s free, you can download from here 2. Qemu Open Source emulator for Windows to create empty virtual disk capatible to Vmware download from here 3. Widows 7 beta 1 ISO must required (32 bit or 64 bit) 4. Vmware Workstation files to use Vmware-vdiskmanager.exe (not required if you are planning to create virtual disk of size 2GB) you can also use Freeware Vmware Diskmanager GUI. Create windows 7 folder in a drive where you want to keep all your windows 7 Virtual Machine files. How to Install Windows 7 on Windows XP Using Vmware Player 1. Install Vmware Player on your Windows XP 2. Type run->cmd and change directory to Qemu (folder where qemu is extracted) 3. Now Type follow command to create Vmware compatible virtual disk of size 6 GB qemu-img.exe create -f vmdk windows7.vmdk 6G 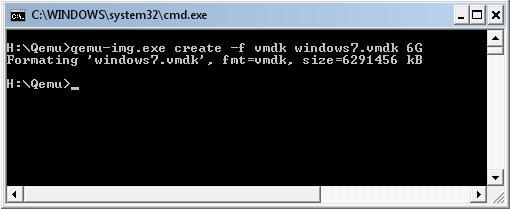 I have created virtual disk of size 10GB & divided into 2GB files using Vmware-vdiskmanager comes with Vmware workstation, Reason of doing this is that Windows XP doesn’t support files larger then 2 GB because of addressing issue. You want to create virtual disk of size 15GB then type at command prompt cmd->dir to VMware workstation directory. and type following command. vmware-vdiskmanager.exe -c -s 15Gb -a ide -t 1 -q windows7.vmdk  4. To create .vmx file for Windows 7 use can use online vmx file builder (VMX file is Vmware virtual machine core configuration file and each virtual machine has its own .vmx file.) Enter Following information while using VMX builder. Display Name: Windows XP Guest OS: Windows XP Professional Edition Memory: 512 MB (Windows 7 Requires Minimum of 512 MB RAM) Check: Sync Clock, VMTools Reminder, USB Host, Autoconnect Ethernet: Check ETH0, Address Type: Generated, Address (leave default), Connection Type: Bridged (more info) Check Sound Card, Type: Ensoniq ES1371, Check Absolute Mouse, NVRam Filename: nvram, IDE0:Master: Checked, File Name: WinXP.vmdk, Device Type: disk, Mode: Persistent, Check: WriteThrough, AutoDetect, Start Connected, IDE1:Master: Checked Device Type: cdrom-raw, Mode: Persistent Check: WriteThrough, AutoDetect, Start Connected OR you can download pre-configured windows7.vmx file from here. 5. Once you have created .vmx file save it in your windows 7 folder (virtual machine folder where all your Windows 7 Virtual machine files will be stored) 6. Now you should have Windows 7 folder with following files a. widnows7.iso (windows 7 beta 1 iso file) b. windows7.vmx file c. windows7.vmdk files (empty virtual disk files) 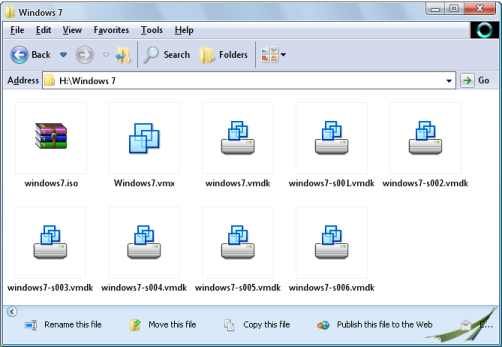 Don’t forget to change ide1:0.present = “TRUE”To ide1:0.present = “TRUE”In your windows7.vmx file if you have created by yourself. No need to do any thing if you have downloaded windows7.vmx from here. Above changes is done to use windows7.iso file as cdrom image file to let us install windows 7 on our virtual machine. Hence no need to burn windows7.iso file on DVD. 7. Now double click on windows7.vmx file and it will automatically open with Vmware player. 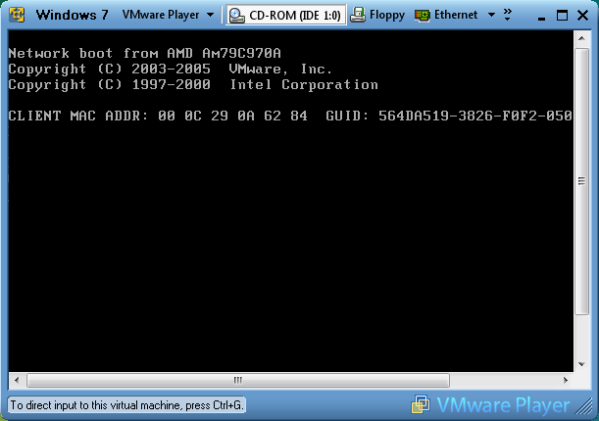 8. Vmware player will boot like normal machine and will detect windows7.iso file as soon as it finish booting. A prompt will be displayed to select option i.e to start windows 7 installation. 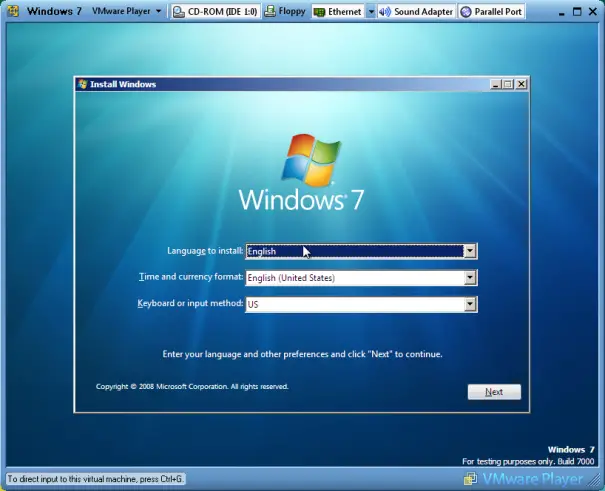 9. Complete the Windows 7 instillation steps and wait for installation to finish. 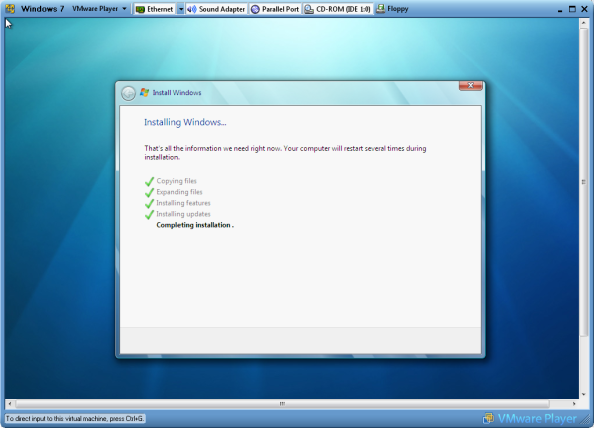 10. Once your Windows 7 boots for first time just make sure every thing is working fine by browsing Computer or Checking Program files. 11. Now its time to install Vmware tools. You need Extract Vmware tools from vmware workstation which contains windows.iso file. open this file with any iso opener like freeware CDimage. There are a few ways by which you can transfer the VMware Tools.msi file but I find the easiest is to just share it out from your host computer and connect via the network from your virtual machine. Once you have VMware Tools.msi on your virtual machine’s disk, double-click it and do a standard install. 12. To enable sharing between your Windows 7 and Windows XP copy following lines and add to your windows7.vmx file at the end (Assuming you need to share E: drive of your host operating system with windows 7) sharedFolder0.enabled = “TRUE”Don’t forget to revert back the changes we had done in step number 6. 13. Now when you will start your Windows 7 you need to enable Vmware Player ->Share folders ->Check Always enable to enable sharing. 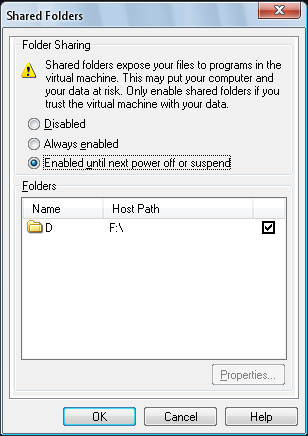 14. Now after your Windows 7 boots, access your share folder by Mapping shared folder from Network and Install Vmware Tools.msi. That’s it, Now Your Virtual Windows 7 Machine on Windows XP is ready for Use. 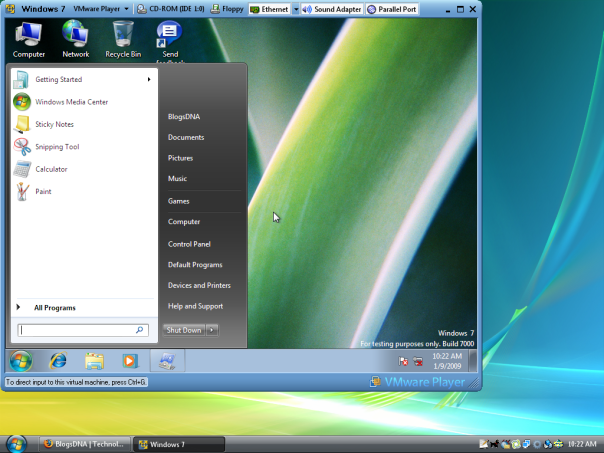 Please Note: I am running Windows XP SP 2 and using Windows Vista Transformation Pack so please do no confuse with screenshots, this is not Windows Vista. Let me know if you have trouble in following any steps or any issue in installing Windows 7 on Vmware Player. Similar Posts:
ویرایش توسط دانه کولانه : 01-11-2009 در ساعت 04:10 PM 
|


| جای تبلیغات شما اینجا خالیست با ما تماس بگیرید | |
|
|
|
|
| کاربران در حال دیدن موضوع: 1 نفر (0 عضو و 1 مهمان) | |
 حالت خطی

|
|

اکنون ساعت 12:26 AM برپایه ساعت جهانی (GMT - گرینویچ) +3.5 می باشد.