|
|
|
|||||||


| دانلود نرم افزار و برنامه های کاربردی applications در این تالار به معرفی پرسش و پاسخ و دانلود نرم افزار های مختلف بپردازید (دانلود برنامه) |
 |
|
|
ابزارهای موضوع | نحوه نمایش |
|
#1
 01-21-2009
|
||||
|
||||
|
دانلود نرم افزار How to Take Ownership & Grant Permissions to Access Files & Folder in Windows 7 و یا مشاهده مقاله
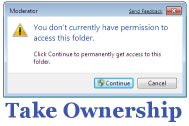 If you are windows vista users then your will be probably knowing file ownership and permissions related issue in windows vista which is extended to windows 7 too, but for those Windows XP users experimenting with Windows 7 might not know about this. Windows 7 has implemented addition security mechanism to prevent accidental or intentional file or folder modification by not allowing users other then owner of file or folder to access it. Hence incase if you need to access, modify or delete such files or folder you need to take ownership first then assign rights or permission to respective users. Here is Guide on How to take Ownership and Grant Permission in Window 7. How to Take Ownership in Windows 7 1. Locate the file or folder on which you want to take ownership in windows explorer 2. Right click on file or folder and select “Properties” from Context Menu 3. Click on Security tab 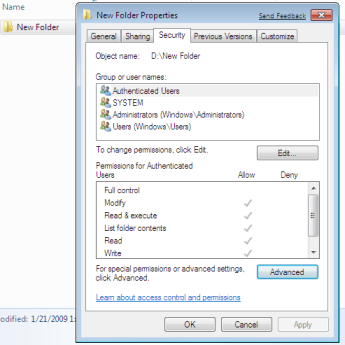 4. Click on “Advance” 5. Now click on Owner tab in Advance Security Settings for User windows 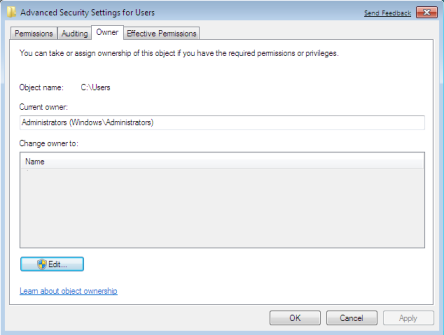 6. Click on Edit Button and select user from given Change Owner to list if user or group is not in given list then click on other users or groups. Enter name of user/group and click ok. 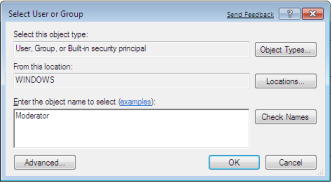 8. Now select User/group and click apply and ok. (Check “Replace owner on subcontainers and objects” if you have files and folder within selected folder) 9. Click ok when Windows Security Prompt is displayed 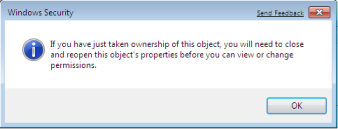 10. Now Owner name must have changed. 11. Now click Ok to exist from Properties windows Once you have taken the Ownership of file or folder next part comes is Granting Permissions to that file/folder or object. How to Grant Permissions in Windows 7 1. Locate the file or folder on which you want to take ownership in windows explorer 2. Right click on file or folder and select “Properties” from Context Menu 3. Click on Edit button in Properties windows Click ok to confirm UAC elevation request. 4. Select user/group from permission windows or click add to add other user or group. 5. Now under Permission section check the rights which you want to grant i.e check “Full Control” under the “Allow” column to assign full access rights control permissions to Administrators group. 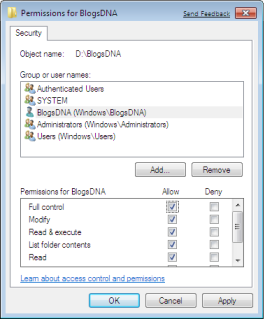 6. Click Ok for changes to take effect and click ok final ok to exit from Properties window. Now you can access files of folder in windows 7 with full permissions and take full control. Here is another simplest method to take ownership, Method to Add Take ownership Option in Right Click Menu. Similar Posts:

|


| جای تبلیغات شما اینجا خالیست با ما تماس بگیرید | |
|
|
|
|
| کاربران در حال دیدن موضوع: 1 نفر (0 عضو و 1 مهمان) | |
 حالت خطی

|
|

اکنون ساعت 08:10 AM برپایه ساعت جهانی (GMT - گرینویچ) +3.5 می باشد.